Modding documentation
Last update: 12th november 2025Best practices
In order for your mod to be added to the app as soon as possible, you must ensure that it complies with all requirements so it can be playable on all devices and platforms (Android, iOS, Mac, Windows).
As game designers do, you have to optimize all your mod's assets. Always find the right balance between file size and file quality. Keep in mind that every kilobyte saved counts for your mod to run smoothly, even on small or low-performance devices, so all users could enjoy it.
We advise you to stay focus on your HD assets during the entire building process, then to manage LD files compliance at the end. LD files (low definition) are just HD files with a half resolution, so for a good start just remove all -ld files from your mod folder.
The Modbox
The Modbox is a folder containing a mod example based on V4 assets plus useful source files. Organize your own assets based on this specific file structure. Import and try the modbox from the settings pannel of the Incredibox app so you can see exactly how your mod will look for users.App.json
modbox/app.jsonYou have to edit the app.json file to change information about the mod such as title, modder credits, loop duration, number of animations, bonuses, path to files, etc. Example below:
{
    "name": "Modbox",			// Your mod name
    "date": "2025-05-19",		// Mod creation date "year-month-day"
    "looptime": 8000,			// Sound loop duration in milliseconds
    "bpm": 120,				// Rhythm (Beats Per Minute) of the music [only for info]
    "totalframe": 384,			// How many frames per animation (in principle: looptime x 2 x 24ips)
    "bonusloopA": true,			// true if bonus can only start on loopA and not on loopB (depends on your musical composition)
    "bonusendloopA": false,		// true if you want to force the metronome to restart a loopA after a bonus has finished when it should in principle have been a loopB (really rare)
    "colors":["#D8A365", ...],		// 6 hex colors gradient based on your mod's main hue (see home-screen.ai in the modbox and ensure proper UI readability in the app)
    "animearray": [			// List of sound/animation files (max 20)
        {
            "name":"drum1_kick",	// name of the animation/sound file (without extension) stored in both the anime/ and sound/ folders
            "color":"#E5A90E",		// hexadecimal pictogram color
            "uniqsnd":false 		// true if sound composed with only one loop, false if composed with 2 loops (A and B)
        },
        { ... }
    ],
    "bonusarray": [			// List of bonuses (max 3) "bonusarray" can be removed if you don't have bonuses
        {
            "title": "Love",		// Title of the bonus [only for info]
            "code": [1,2,6,11,17],	// Array of 5 picto ids to unlock the bonus
            "name": "b1-love",		// File name of the mp4 video file (without extension) stored in the bonus/ folder
            "sound": "bonus1_love",	// File name of the bonus sound (without extension) stored in the sound/ folder
            "predrop": "bonus_predrop",	// File name if a sound should play before the bonus launch
            "loop": 1			// How many loops the bonus lasts
        },
        { ... }
    ],
    "credit":{				// Modder info
        "crewname": "ARP modders",	// Modder crew name
        "process":["Allan", "Romain"],	// Roles of modders (names needs to be separated by double-quotes and commas so users can search for a specific modder's name using the search form)
        "music":["Paul"],		// Just remove a "role" if not needed
        "design":["Romain"],
        "animation":["Allan"],
        "thanks": "To the best community ever"
    }
}
Image
modbox/image/You can replace files within the image/ folder with your own (mod icon, home screen, picto, etc.). We provide you with some original source files (Adobe Illustrator) so you can better understand how to make them. Take care to respect the object position in the page, image size exported, extension file and file names (images in this folder need to keep their original name and their original size/resolution).
modbox/image/crew.jpg (1120x800px) [optional]
An optional illustration of your crew to customize the modder credit section. You can remove it if you don't want an image showing your modder crew (but it would be a shame to miss out!).
modbox/image/game-bck.jpg (2048x800px)
The background behind the characters on the stage, you can edit the "color" layer in the .ai source file.
modbox/image/game-bck.gif (2048x800px) [optional]
An optional animated background. If presents in the folder, it will overwrite thegame-bck.jpg file during the loading process.
modbox/image/game-front-bot.png (2048x800px) [optional]
An optional transparent bottom foreground in front of characters on the stage. Just remove it from the folder if you don't want a foreground.

modbox/image/game-front-top.png (2048x800px) [optional]
An optional transparent top foreground in front of characters on the stage. Just remove it from the folder if you don't want a foreground.
modbox/image/game-picto.png ((136 x number_of_pictos)x272px)
The picto (accessories icon) to drag and drop onto characters on the stage (PNG format to keep transparency during drag and drop). The width of the image has to match the number of pictos/loops/animations in your mod.
- If you have 20 pictos/animations -> (136 x 20) = 2720px
- If you have 11 pictos/animations -> (136 x 11) = 1496px
- etc.
- If you have 20 pictos/animations -> (136 x 20) = 2720px
- If you have 11 pictos/animations -> (136 x 11) = 1496px
- etc.
modbox/image/home-screen.jpg (2976x1420px)
The home screen of your mod. Edit the .ai file to export your own (respecting element size and position). The color of the gradient halo must match the last hexadecimal value you've set in the colors array from app.json.
modbox/image/icon.jpg (500x500px)
The icon displayed in the Incredimods list once your mod has been installed. Size and position of the face must match the source file provided.
Sound
modbox/sound/You can use any music editing software to record, edit and export your sound loops (only MP3 files are accepted). Replace the files in the sound/ folder with your own. The names of your audio files must match the key/value name in animearray from app.json (names of audio files and animation sprites are the same).
Loops mechanism
• All loops have the same duration (neither too short nor too long, do something consistent for the user experience).
• The duration of your loops must be set using the looptime key/value from app.json.
• Incredibox’s music engine launches a looping metronome based on the looptime duration.
• Each time the metronome does a loop (each bar), it switches between 2 states: loopA, loopB, loopA, loopB, etc. This allows for more variations within the musical composition. For example, you can have a basic beat with a binary rhythm during loopA (first bar), making a small change during loopB (second bar). This means that, if your sound never changes from loopA to B, include only one sound file in the folder (uniqsnd: true in app.json). Otherwise, include 2 sounds with stateA and stateB. Analyze the following diagram: during loopB, the metronome will play stateB of a sound if it exists: otherwise, it will play stateA.
|1		|2		|3		|4		|5		| ... |
|loopA		|loopB		|loopA		|loopB		|loopA		| ... |
|beat_stateA	|beat_stateB	|beat_stateA	|beat_stateB	|beat_stateA	| ... |
|voice_stateA	|voice_stateA	|voice_stateA	|voice_stateA	|voice_stateA	| ... |
sound/mp3/beat_a.mp3
sound/mp3/beat_b.mp3
sound/mp3/voice_a.mp3
Bonus music mechanism
• The audio duration of your bonus must be a multiple (x1, x2, x3, x4, etc) of your sound loops.
• The bonus can be launched in loopA or both A and B (see bonusloopA in app.json).
• You can launch a sound called predrop during the loop before the bonus starts (see predrop in bonusarray from app.json).
• Example with a 2-loop bonus which must start at loopA with a predrop sound.
|1		|2		|3		|4		|5		| ... |
|loopA		|loopB		|loopA		|loopB		|loopA		| ... |
|beat_stateA	|beat_stateB	|		|		|beat_stateA	| ... |
|voice_stateA	|voice_stateA	|		|		|voice_stateA	| ... |
|		|predrop	|bonus_playing	|bonus_playing	|		| ... |
sound/mp3/beat_a.mp3
sound/mp3/beat_b.mp3
sound/mp3/voice_a.mp3
sound/mp3/bonus.mp3
sound/mp3/bonus-predrop.mp3
Audio optimization
Once all your sounds loop are 100% finished, you have to export it as MP3 files (best format so your mod can be cross-platform and playable on any devices by users). To provide users with the best audio experience, make sure each combination sounds good to your ears and be very careful never to touch saturation in the stereo output of your DAW before exporting. As music producers do, always take care of having the lowest file size possible by losing audio quality until a non perceptible level. For example if you check audio files we provide in the modbox, you will see MP3 files size around 50 and 100 Ko.
Bonus
modbox/bonus/You can use any video software to make your video (we recommend using Adobe Animate). Replace files in the bonus/ folder with your own. Your video must be 1920x768px, in MP4 format only. Your video must not include any audio tracks.
• You can include up to 3 videos in your mod (if 0, just remove bonusarray in app.json).
• The duration of your video must be a multiple (x1, x2, x3, x4, etc) of your sound loops.
• Bonuses can have different lengths (see loop in bonusarray).
• The names of your video files must match the key/value name in bonusarray.
• Beside your MP4 video file, put an SVG file (70x70px) with the same name.
modbox/bonus/bonus_name.mp4 (1920x768px)
The HD MP4 video file of your bonus (no audio tracks included).
modbox/bonus/bonus_name-ld.mp4 (960x384px)
The LD (low definition) MP4 video file of your bonus (no audio tracks included) for small and low-performance devices.
modbox/bonus/bonus_name.svg (70x70px)
A 70x70px SVG icon of your bonus in which you can draw a 56x56px vector icon.
Video optimization
Once all your videos are 100% finished, you have to export them as MP4 files. As video producers do, always take care of having the lowest video file size by loosing details and quality until an acceptable level. For example if you check video files we provide in the modbox, you will see MP4 files size around 500 Ko (of course it depends the video duration and graphism complexity, videos from Dystopia which are longer are around 5 and 8 Mo).
We recommend Handbrake for video compression. This software reduce mp4 file size and let you export a half size version (LD format) from your HD video.
Anime
modbox/anime/In this folder, you have to organize your animated character files (aka the polos). The Incredibox graphics engine works with a homemade mechanism. You have to use Adobe Animate to open and edit our .fla source file. It will let you save so much time on lipsync and you'll never again have to edit every sprite.json file manually 😅
• You can include a maximum of 20 polos in your mod (same number as your loops and pictos).
• Default polo's size on the stage is 164x380px but you can edit it as you wish.
• Prefer vector assets within the SWF so you don't have to worry about resolution.
• The names of your animation files must match the key/value name in animearray.
• Convert your SWF to a PNG sprite with our SWF2Sprite tool.
Custom polo sprite
You can customize the waiting polo on the stage by editing the .ai source file provided in the anime folder. Edit and export your own 0_polo.png sprite to overwrite the default one.
modbox/anime/0_polo.png (1312x960px)
HD sprite of the waiting polo on the stage.
modbox/anime/0_polo-ld.png (656x480px)
LD sprite of the waiting polo on the stage.
Make animation
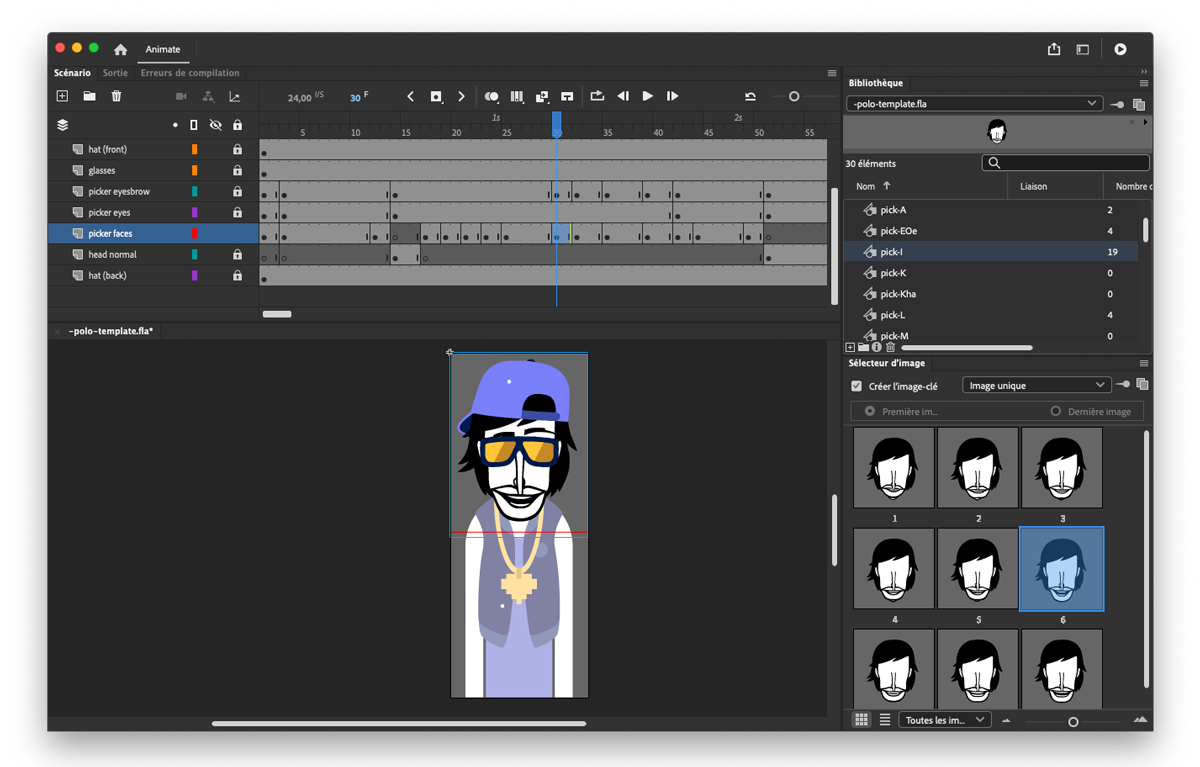
Open and edit the polo-template.fla with Adobe Animate. The specific tree structure and object names in this file are required for the final exportation steps (SWF to PNG sprite). You just have to hit CTRL+ENTER to export and run the SWF file of your animation. Keep this file structure and organization:
file.fla
└── stage
    └── polo
        ├── headanim
        ├── headwait
        └── costume
polo
Double-click the polo object on the stage to enter it. You can see it contains its own timeline with 3 child objects. From there, you can edit the costume object, the headwait and the headanim object. The only thing you have to animate on this timeline is the headanim xy positions.
polo.headanim
The headanim object contains its own timeline on which you'll have to animate each polo's face frame by frame (don't manage the xy head position here, every face stays at the exact same position).
You can manage the lipsync easily thanks to the faces picker we've prepared. Open the Library panel (Window > Library) and find the objects named pick-A, pick-O, pick-K, etc. Drag and drop one of them onto the stage and click on it once. Now, open the frame picker (Window > Frame picker) so you can select the right face variation.
The SWF2Sprite converter tool will automatically check for polo's head height based on objects found on each polo's head keyframe. Meaning the highest face found will be the height for the head's crop zone. So don't leave unused objects (for example an image out of the stage, a transparent object, etc.) in the polo's head timeline, otherwise the tool could be wrong about polo's face height.
headwait
This object is for the waiting state of the character during the game (when polo is waiting for the loop before starting). The headwait can't be animated.
costume
In this object, you can add new clothes to the character. The costume can't be animated. Vector shapes extending beyond the stage will be cropped during the PNG sprite export process.
Convert animation to sprite (SWF2Sprite)
Once your animation looks great, you can convert your SWF into a PNG sprite file. Open our SWF2Sprite tool (you need an SWF reader such as Adobe Flash/Animate installed on your computer) and click Convert to select your SWF animation file. If you've respected the file tree structure and object names from the polo-template.fla, you should see the SWF2Sprite analyzing your animation. It will compare each face to save only different ones before exporting a PNG file (try not exceed more than 40 faces per sprite). Plus, the tool will generate and export a JSON file filled with all data needed by the Incredibox graphics engine (such as polo's head xy position, head height, crop size, etc.).
SWF2Sprite settings
JSON
Export the JSON of your animation. It contains informations such as number of keyframes, xy positions, sizes, etc, so the graphics engine of the app can draw your animation properly.
HD / LD img
Export your animation sprite in HD (high definition) and/or LD (low definition).
Polo Bat
Will add a key "bat":"true" to your JSON animation so the app will draw your animation upside down on the stage. It can be helpful if you want to animate a polo vampire/bat in the right direction then ask the app to display it feet up.
% Diff
To optimize the graphics rendering in the app, animation sprites needs to be as light as posible. Base on the default value of 2% our converter tool will check each polo's faces of your animation to remove similar ones (duplicate content). Basically it means: if there is a difference lower than 2% between 2 images, we assume that they are very close so we can keep only one. On some animations, most often when faces have very few details (robot, mask, etc.), the tool can think 2 frames are the same whereas not, so in this very specific case, you could lower the value of 0.02%. Keep in mind not to exceed 40 polo's faces per sprites.
Include animation
Once you have exported your animation PNG sprite and JSON data, you can put this files into the anime/ folder. Don't forget to add your animation name by editing the key/value name of the animearray array in the app.json file (which is also the name of your MP3 audio loops). Import your mod folder into the Incredibox app to check your animation.
Sprites optimization
To ensure your mod can be playbale on low-performance devices, each of your animation sprites has to come with a HD and LD version (low definition). If the HD PNG file is 2000px width, the LD should be 1000px. You can manage the export of HD and LD PNG files directly from our SWF2Sprite tool for modders or, just add -ld at the end of your LD files.
modbox/anime/0_polo.png
modbox/anime/0_polo-ld.png
modbox/anime/beat.png
modbox/anime/beat-ld.png
modbox/anime/voice.png
modbox/anime/voice-ld.png
etc.
Warning: depending on your sprites complexity (more than 40 polos' faces) some low-performance devices starts to run really slowly. This is why image optimization is important, save as much kilobyte as you can by finding the right balance between image quality and file size.